The taper fade buzz cut is not just a hairstyle, it is a precision cut that separates a sharp, well groomed man from everyone else in the room. It commands respect on Day 1 and still looks intentional on Day 10, making it one of the most requested styles in every professional barbershop today.
Most barbers clip the top short and call it a buzz cut. But a true taper fade buzz cut demands real technical knowledge guard increments, occipital bone placement, taper lever control, and a blending technique that eliminates every harsh line before the cape comes off. This guide breaks down every layer of that process so you walk into the barbershop knowing exactly what a great cut looks and feels like.
What Defines a Taper Fade Buzz Cut?
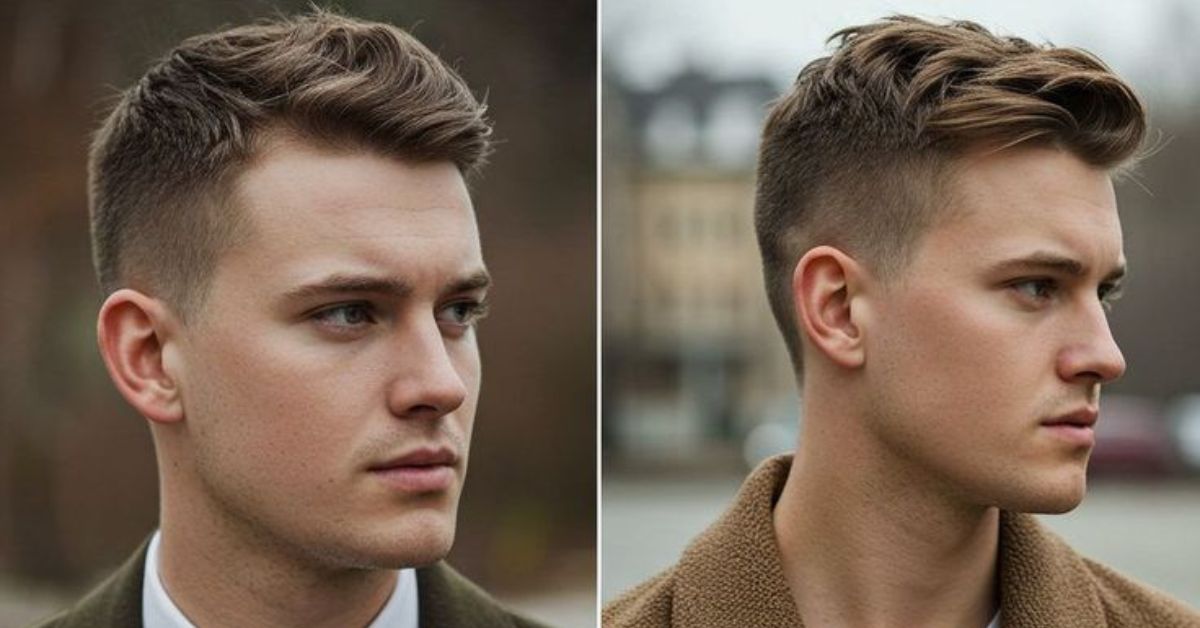
A taper fade buzz cut merges two distinct barbering techniques into one cohesive style. The buzz cut cuts the hair on top to a short, uniform length using a single clipper guard. The taper fade then graduates the hair from that length down to a very short or skin-level finish at the neckline and temples.
A taper ends at a short guard length above the natural hairline, keeping a sliver of visible hair at the perimeter. A fade pushes that graduation lower and faster, ending very close to skin. A skin fade removes every trace of hair at the perimeter, cutting all the way down to bare scalp with no guard at all. The taper fade buzz cut combines the clean buzzed top with a controlled fade at the sides giving you versatility that works in a boardroom and on a weekend.
| Technique | Lowest Point | Graduation Speed | Ideal Occasion |
| Taper | Short (Guard #0.5 or #1) | Gradual, subtle | Office, formal settings |
| Fade | Very short, near-skin | Faster graduation | Casual, everyday wear |
| Skin Fade | Bare skin (no guard) | Most dramatic contrast | Bold, high-maintenance style |
| Taper Fade Buzz Cut | Near skin at perimeter | Controlled, blended | Versatile office to social |
Why the Buzz Cut with Taper Works for Every Hair Type
A buzz cut with taper controls bulk at the perimeter, a critical advantage for Type 3 (Curly) and Type 4 (Coily) hair that naturally expands outward. The taper collapses that expansion at the sides, giving the head a cleaner, more structured silhouette.
For Type 1 and Type 2 (Straight to Wavy) hair, the taper fade buzz cut creates visible contrast that adds depth and visual interest to otherwise flat-laying strands. The technique flatters every scalp shape with the right placement adjustments covered in Section 3.
Choosing Your Style: Low vs. Mid vs. High Taper
The height of your fade determines the entire vibe of your taper fade buzz cut. Your face shape, head shape, professional environment, and hair texture all influence which taper height serves you best.
Popular Taper Fade Buzz Cut Styles
1. Low Taper Buzz Cut

The low taper buzz cut starts just 1-2 cm above the ear and gradually fades down to skin at the neckline. This style delivers a clean, conservative look that works perfectly in professional and office environments. It is the most low-maintenance version of the taper fade buzz cut and lasts 3–4 weeks before needing a refresh.
- Best for office and formal settings
- Ideal for receding hairlines
- Maintenance: every 3–4 weeks
- Works on all hair textures
2. Mid Taper Fade Buzz Cut

The mid taper fade buzz cut starts at temple level and creates a noticeable contrast between the buzzed top and the faded sides. It strikes the perfect balance between bold and professional, making it the most requested style in any barbershop. This taper fade buzz cut suits almost every face shape and fits both casual and formal occasions equally well.
- Most popular and versatile style
- Suits oval, square, and triangle face shapes
- Maintenance: every 2–3 weeks
- Works on thin, medium, and thick hair
3. High Taper Fade with Buzz Cut

The high taper fade with buzz cut starts at the top of the parietal ridge and delivers the boldest, highest contrast result of all styles. It adds significant visual height to the head, making it the go to choice for round face shapes that need elongation. This taper fade buzz cut makes a strong style statement but demands frequent upkeep to stay sharp.
- Best for round face shapes
- Adds visual height and structure
- Maintenance: every 1–2 weeks
- Bold, street ready appearance
4. Tapered Buzz Cut with Line Up

The tapered buzz cut with line up takes the classic buzz cut taper and adds a crisp, straight edge at the frontal hairline with squared-off temples. This sharp detail elevates the entire look and adds a layer of definition that separates a good cut from a great one. It pairs well with any taper height and works as an add-on to any taper fade buzz cut style.
- Adds sharp frontal hairline definition
- Squares off temples for extra structure
- Can be combined with low, mid, or high taper
- Requires T-outliner for clean execution
5. Buzz Cut Taper for Receding Hairlines

The buzz cut taper for receding hairlines brings the top down to a #2 or #3 guard and blend the sides with a low taper fade, eliminating the harsh contrast between thinning areas and longer hair. The eye reads uniform density across the entire head rather than focusing on the recession. This is one of the most confidence-restoring versions of the taper fade buzz cut for men dealing with early hair loss.
- Eliminates contrast between thinning and longer areas
- Low taper recommended avoid high fades
- Creates illusion of uniform hair density
- Works best with #2 or #3 guard on top
Matching Your Face Shape to the Right Taper
- Oval face: any taper height works; the mid taper is the safest starting point
- Square face: choose a low or mid taper to soften the jaw and avoid adding width
- Round face: go high taper to add height and elongate the face visually
- Diamond face: stick with a low taper to maintain width at the sides and balance the narrow chin
- Triangle face: a mid taper keeps bulk centered on the head rather than emphasizing a wider jaw
Buzz Cut Taper for Receding Hairlines
A buzz cut taper for receding hairlines works because it eliminates the harsh contrast between thinning areas and longer hair. When you bring the top down to a #2 or #3 buzz cut and taper the sides with a low taper buzz cut, the eye reads uniformity — not recession.
Always avoid a high taper fade if your hairline is receding. The high start point pulls the eye upward toward the sparse crown, the exact opposite of what you want to achieve.
Scalp Anatomy & Fade Placement Logic
Understanding head anatomy separates amateur barbers from masters. You cannot execute a clean taper fade buzz cut without knowing how the skull’s surface affects blade travel, guide line placement, and blending zones.
The Occipital Bone: Your Anchor Point
The occipital bone forms the lower-rear portion of the skull. It creates a natural ridge on the occipital shelf that juts outward before curving back toward the neck. This ridge serves as your natural low guide line for any nape taper.
- A prominent occipital bone pushes the hair outward, making the nape look fuller. Begin your taper slightly higher than the ridge to compensate for the added projection.
- A flat occipital bone gives you a more blending surface. Start the taper lower and build a longer, cleaner graduation across the wider surface area.
- Always perform a flat-palm check before you begin — run your palm across the back of the head to feel the ridge depth and plan your guide lines before the first clipper passes.
Ear Shape and Temple Adjustment
Ears that sit high on the skull require you to start the temporal fade slightly higher to maintain visual symmetry. Ears that sit lower need the reverse. Always measure the fade start point relative to the top of the ear never from an assumed fixed position on the scalp.
The parietal ridge, the widest point of the skull above the ear determines where your high fade tops out. On a high taper fade with buzz cut, your blending zone lives directly on this ridge. Go above it and you risk a disconnected, patchy line that no amount of blending will fully correct.
Technical Note: Hold your comb horizontally at the ear as a visual level before the first pass. Asymmetrical ears fool the eye; the comb never lies.
Step by Step Technical Execution
This methodology applies to a mid taper fade buzz cut as the baseline. Adjust guard numbers and start heights to shift this into a low or high taper based on your client’s needs.
Tools You Need Before You Begin
- Main Clipper: Wahl Magic Clip or Andis Master both offer smooth taper lever control
- Trimmer / Liner: Andis T-Outliner for edge definition and perimeter detail
- Guards: Full set from #0 through #8, plus a #1.5 if available
- Blending Brush: Boar bristle removes loose hair and reveals true blending zones
- Clipper Oil: Apply every 30 minutes of continuous use; overheated blades drag and pull
- Mirror + Neck Duster: Always finish with a 360° reveal clients notice what you miss from the back
Step 1: Set the Bulk on Top First
Use your chosen guard (#2 for a classic buzz cut, #3 for a slightly longer finish) and clipper the entire top against the grain. Work in overlapping passes from front to back, then side to side to eliminate tracking lines before you move to the sides.
Step 2: Establish Your Guide Lines
Set the bottom guide line at the nape using a #0.5 or bare blade, half an inch above the natural hairline. Set the top guide line one guard size below your buzz cut guard at temple level. These two anchor points define your blending corridor every guard transition happens between them.
Step 3: Build the Graduation with Guard Increments
Work upward from the bottom guide using #0, #0.5, #1, and #1.5 each guard starting slightly higher than the last. Use a scooping motion on each pass: flick the clipper away from the head at the top of each stroke to avoid pressing a hard line into the graduation.
Step 4: Blend with the Taper Lever
Run the clipper through the transition zone with the taper lever half-open. This position cuts between guard sizes and eliminates the seam between graduation points. This single technique separates a clean, seamless fade from a choppy, banded one — and it takes deliberate practice to execute consistently.
Step 5: Detail the Perimeter
Switch to your T-outliner and define the hairline at the temples and nape. For a tapered buzz cut with line up, crisp the frontal hairline into a clean straight edge. Use a comb as a visual ruler, freehand lines on a curved forehead rarely stay symmetrical through the full length of the cut.
Step 6: Final Blend and Reveal Check
Dust off with your boar bristle brush and examine the cut under both direct and angled lighting. Harsh lines that survive the blend process always appear in cross-light. Use the lever method to touch up any remaining seams, then apply a light finishing balm or grooming powder before the mirror reveals.
Precision Guard Case Study by Hair Density
Hair density is the variable most at-home clippers ignore and it is the reason a technique that works perfectly on one client creates a mess on another. Here is how I adjust the guard sequence across three density categories to achieve a seamless taper fade buzz cut every time.
Thin hair (fine / low density)
requires you to work conservatively at the perimeter. Fine hair shows skin much faster than thick hair, so I use a #2 on top to add perceived fullness rather than going shorter. In the blend zone I use #1.5 lever-open transitioning to #1 fully open. At the nape, a bare blade reveals skin naturally without aggressive technique.
Medium hair (normal density)
follows the standard sequence described in Section 4 without significant adjustment. A #2 or #3 guard on top sets the perfect base, transitioning through #1.5 into #1 in the blend zone, and finishing with a bare blade or #0 at the nape delivers a flawless, textbook result on medium density hair.
Thick hair (dense / coily)
demands the most technical adjustment. I start with a #3 or #4 on top to control bulk rather than fight it. The blend zone needs #2 lever half-open moving into #1.5 lever open skipping straight from #2 to #1 on thick hair creates a visible band. At the nape I use the back stopping technique: run the bare blade with the grain (downward) to eliminate the grey shadow that coil patterns leave behind after a close pass.
| Zone | Thin Hair | Medium Hair | Thick Hair |
| Top (Buzz) | #2 adds fullness | #2 or #3 standard | #3 or #4 controls bulk |
| Blend Zone (Upper) | #1.5 lever open | #1.5 lever half open | #2 lever half-open |
| Blend Zone (Mid) | #1 fully open | #1 or #1.5 standard | #1.5 lever open |
| Lower Fade | #0.5 — go slow | #0.5 standard | #0.5 multiple passes |
| Perimeter / Nape | Bare blade | Bare blade or #0 | Bare blade + back-stropping |
How to Communicate with Your Barber
The most technically skilled barber cannot deliver your ideal taper fade buzz cut if you walk in and say “just clean it up a bit.” Barbers operate on shared terminology. Use the right phrases and you get the right cut every time.
The Pro Talk Phrase Guide
For a standard cut, say: “I want a #2 buzz cuts on top with a low taper fade down to skin at the neckline.”
If you prefer a tighter, more defined look, tell your barber: “Keep the fade tight, start it just above the ear and bring it to a mid taper, blended with no harsh lines.”
To add extra sharpness, simply say: “Put a straight line up at the forehead and square off the temples. I want a tapered buzz cut with line up.”
For curly or coily hair, say: “My hair is Type 3 coily. I need extra passes in the blend zone and a back-strop at the nape to kill the shadow.”
Questions to Ask Before the First Clipper Pass
- “What guard size do you recommend for my hair texture and face shape?”
- “Can you show me where the taper will begin before you start cutting?”
- “How long before this needs a touch-up to stay sharp?”
- “Do you adjust your technique for my hair density?”
These four questions establish a shared understanding before a single blade touches your head and they immediately signal to your barber that you know what you are talking about.
Maintenance, Growth Cycle & Scalp Care
The 14 Day Growth Cycle: What to Expect
A taper fade buzz cut looks its sharpest in the first 72 hours. Understanding how the style degrades over two weeks helps you plan appointments intelligently and stops you from booking too early or waiting too long.
Day 1 to Day 3 is the peak window. Lines are crisp, the fade contrast is at its highest, and the perimeter sits exactly where the barber placed it. This is the cut at 100%.
Day 4 to Day 7 brings the first noticeable softening. New growth blurs the line up at the forehead and temples. The taper graduation still reads as intentional, but skin-faded areas begin showing light shadow particularly at the nape.
Day 8 to Day 14 the fade graduation becomes subtle rather than sharp. The overall cut still looks tidy and groomed, but it has lost the definition that made it stand out. This is your appointment window book now rather than waiting until it fully grows out.
How to Maintain a Taper Fade Buzz Cut at Home
If you own a reliable clipper the Wahl Cordless Magic Clip is my top recommendation for home use you can extend your barbershop visits significantly with a 10-minute nape cleanup every 7 days.
- Step 1: Use your bare blade to clean 1 cm above the nape hairline, straight across with no sculpting
- Step 2: Run your #0.5 guard along the temple edge to freshen the fade perimeter
- Step 3: Do not touch the blend zone yourself disrupting the graduation requires a professional session to repair correctly
- Step 4: Apply a small amount of Dove Men+Care Scalp Defense post-trim to soothe any irritation from clipper heat
Best Products for Buzzed Hair & Scalp Health
Use a lightweight scalp moisturiser daily Jack Black Scalp & Body Lotion prevents the dry flaking that exposed scalp develops without longer hair covering it. Apply an SPF scalp spray like EltaMD UV Clear SPF 46 every time you head outdoors, because a buzzed scalp receives direct UV exposure that longer hair previously blocked. Finish each home trim session with Cremo Cooling Shave Balm at the nape to soothe the skin that the bare blade passed over.
Pro Scalp Tip: A freshly buzzed scalp loses moisture 3× faster than scalp covered by longer hair. Apply your moisturiser within 10 minutes of rinsing that window to capture maximum hydration before the cuticle closes.
FAQs
Q: How often should I trim a taper fade buzz cut?
A high taper fade buzz cut needs a refresh every 1-2 weeks, while a low taper buzz cut comfortably lasts 3-4 weeks before needing a touch-up.
Q: What is the difference between a buzz cut taper and a skin fade?
A taper keeps a sliver of visible hair above the hairline, while a skin fade cuts all the way down to bare scalp with no guard at all.
Q: Does a taper fade buzz cut work for curly hair?
Yes, the taper fade buzz cut controls the natural expansion of Type 3 and Type 4 curl patterns, giving the head a cleaner, more structured silhouette.
Q: What guard size works best for a buzz cut on top?
A #2 guard (¼ inch) delivers the classic buzz cut look, while a #3 guard suits with thicker hair or those who prefer a slightly softer finish.
Q: Is a taper fade buzz cut professional enough for the office?
A low taper buzz cut with a clean line up is one of the sharpest, most professional hairstyles a man can wear in any work environment.
Q: Can a taper fade buzz cut work for a receding hairline?
Absolutely a low taper buzz cut brings everything down to a uniform length, eliminating harsh contrast between thinning and longer areas.
Q: How do I maintain a taper fade buzz cut at home between appointments?
Clean the nape with a bare blade weekly, freshen temple edges with a #0.5 guard, and never touch the blend zone yourself.
Conclusion
A great taper fade buzz cut never happens by accident. It results from the correct guard sequence, precise knowledge of scalp anatomy, a clear understanding of how hair density changes the technique, and smart communication between client and barber. Every section of this guide reflects real chair experience not surface-level theory pulled from a generic list.
You now know how to choose the right taper height for your face shape, understand how the occipital bone influences fade placement, follow a professional step by step execution method, and maintain your taper fade buzz cut at home between appointments.
Whether you book a low taper buzz cut for the boardroom, a mid taper fade buzz cut for everyday sharpness, or a high taper fade with buzz cut for maximum impact, walk into that barbershop with this knowledge in hand. The cut you leave with will be exactly what you envisioned.
Pure Hair Logic Team is a group of professional men’s grooming experts and hairstyle enthusiasts dedicated to helping men look their best. With years of experience in men’s hair care, styling, and barbering trends, our team researches and writes detailed guides to help you choose the perfect hairstyle for every occasion.